User Guide
This is a comprehensive guide to deploying ML projects to Kubernetes using Bodywork. It assumes that you understand the key concepts that Bodywork is built upon and that you have worked-through the Quickstart Tutorials.
Configuring a Project for Deployment with Bodywork
Bodywork does not impose any constraints on how your choose to structure or engineer your projects. So long as each stage in a workflow (or pipeline) can be backed by an executable Python module, then all Bodywork needs to deploy your project is configuration data contained with a bodywork.yaml file. This YAML based configuration file describes how Bodywork should deploy your project, and will be the main focus of this user guide.
As an example that we will frequently refer back to, consider the following project for a ML pipeline with the following distinct stages: prepare data (or features), train models (one module for SVMs and another one for Random Forests), perform model selection, and then deploy the chosen model as a microservice that exposes a REST API for scoring data:
root/
 |-- prepare_data/
     |-- prepare_data.py
     |...
 |-- train_svm/
     |-- train_svm.py
     |...
 |-- train_random-forest/
     |-- train_random_forest.py
     |...
 |-- choose_model/
     |-- choose_model.py
     |...
 |-- model_scoring_service/
     |-- model_scoring_app.py
     |...
 |-- raise_alerts.py
 |-- bodywork.yaml
We have chosen to split the project into five directories, one for each stage, but this is not a requirement. There is also a single workflow configuration file, bodywork.yaml, whose contents are shown below and will be discussed in depth in each of the sections below:
version: "1.0"
project:
  name: my-classification-project
  docker_image: bodyworkml/bodywork-core:latest
  DAG: prepare_data >> train_svm, train_random_forest >> choose_model >> model_scoring_service
  run_on_failure: send_notifications
stages:
  prepare_data:
    executable_module_path: prepare_data/prepare_data.py
    requirements:
      - boto3==1.16.15
      - pandas==1.1.4
    cpu_request: 0.5
    memory_request_mb: 100
    batch:
      max_completion_time_seconds: 30
      retries: 2
  train_svm:
    executable_module_path: train_svm/train_svm.py
    requirements:
      - boto3==1.16.15
      - pandas==1.1.4
      - joblib==0.17.0
      - scikit-learn==0.23.2
    cpu_request: 1.0
    memory_request_mb: 500
    batch:
      max_completion_time_seconds: 120
      retries: 2
  train_random_forest:
    executable_module_path: train_random_forest/train_random_forest.py
    requirements:
      - boto3==1.16.15
      - pandas==1.1.4
      - joblib==0.17.0
      - scikit-learn==0.23.2
    cpu_request: 2.0
    memory_request_mb: 750
    batch:
      max_completion_time_seconds: 120
      retries: 2
  choose_model:
    executable_module_path: choose_model/choose_model.py
    requirements:
      - boto3==1.16.15
      - joblib==0.17.0
      - numpy==1.19.4
      - scikit-learn==0.23.2
    cpu_request: 0.5
    memory_request_mb: 100
    batch:
      max_completion_time_seconds: 60
      retries: 2
  model_scoring_service:
    executable_module_path: model_scoring_service/model_scoring_app.py
    args: ["30", "ABC"]
    requirements:
      - Flask==1.1.2
      - joblib==0.17.0
      - numpy==1.19.4
      - scikit-learn==0.23.2
    secrets:
      USERNAME: my-classification-product-cloud-storage-credentials
      PASSWORD: my-classification-product-cloud-storage-credentials
    cpu_request: 0.25
    memory_request_mb: 100
    service:
      max_startup_time_seconds: 30
      replicas: 2
      port: 5000
      ingress: true
  send_notifications:
    executable_module_path: raise_alerts.py
    requirements:
      - requests==2.22.0
    cpu_request: 0.5
    memory_request_mb: 100
    batch:
      max_completion_time_seconds: 30
      retries: 1
logging:
  log_level: INFO
Running Tasks in Remote Python Environments
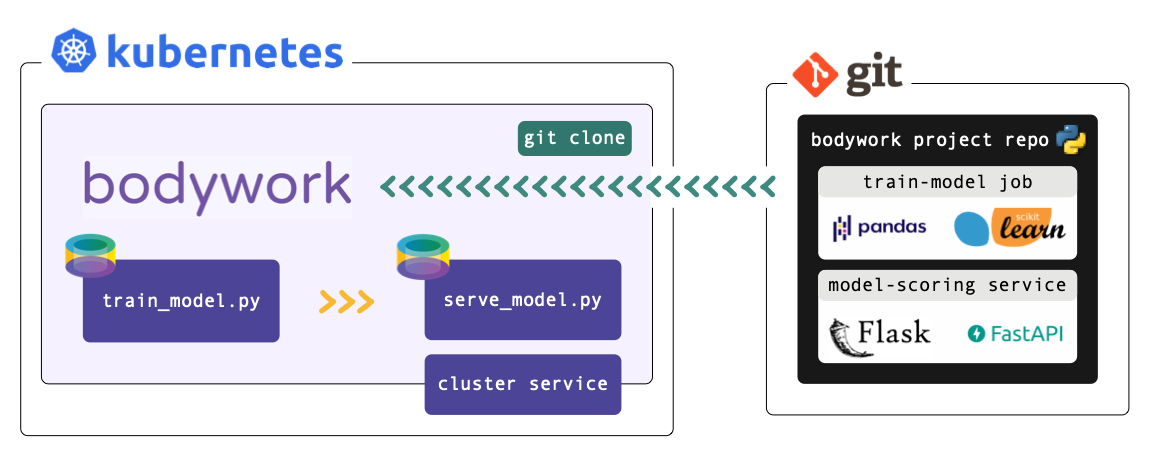
Bodywork projects must be packaged as Git repositories, hosted on GitHub, GitLab, Azure DevOps or BitBucket. When a deployment is triggered, Bodywork starts a workflow-controller that clones the repository, analyses the configuration provided in bodywork.yaml and manages the execution of the workflow.
When the workflow-controller executes a stage, it starts a new Python-enabled container in your Kubernetes cluster, installs any 3rd party Python package dependencies that might be required, and then runs the chosen Python module.
Configuring Workflows
All configuration for the workflow itself is contained within the project section of the bodywork.yaml file. From the example above we have,
project:
  name: my-classification-project
  docker_image: bodyworkml/bodywork-core:latest
  DAG: prepare_data >> train_svm, train_random_forest >> choose_model >> model_scoring_service
  run_on_failure: send_notifications
Each configuration parameter is used as follows:
name- This will be used to identify all Kubernetes resources deployed for this project.
docker_image- The container image to use for remote execution of Bodywork workflows and stages. This should be set to
bodyworkml/bodywork-core:latest, which will be pulled from DockerHub. DAG- A description of the workflow structure - the stages to include in each step of the workflow - this will be discussed in more detail below.
run_on_failure- An optional batch stage to be run only after the workflow fails to complete successfully - i.e. when one of its stages fails. Within this stage's module you could trigger a webhook for posting to Slack, use the Python standard library to send an e-mail, or use the Python client for your company's chosen incident response platform (e.g. PagerDuty). Note, that if Bodywork is unable to start the workflow for any reason (e.g. your cluster cannot access the Bodywork container image or your chosen namespace becomes unavailable), then it will not be able to run the chosen on-failure stage.
Defining Workflow DAGs
The DAG string is used to control the execution of stages by assigning them to different steps of the workflow. Steps are separated using the >> operator and commas are used to delimit multiple stages within a single step (if this is required). Steps are executed from left to right. In the example above,
DAG=prepare-data >> train-svm, train-random-forest >> choose-model >> model-scoring-service
The workflow will be interpreted as follows:
- step 1: run
prepare_data; then, - step 2: run
train_svmandtrain_random_forestin separate containers, in parallel; then, - step 3: run
choose_model; and finally, - step 4: run
model_scoring_service.
Configuring Stages
The behavior of each stage is controlled by the configuration parameters in each stage subsection, within the stages section of the bodywork.yaml file. For the model_scoring_service stage in the example above, we have,
stages:
  model_scoring_service:
    executable_module_path: model_scoring_service/model_scoring_app.py
    args: ["30", "ABC"]
    requirements:
      - Flask==1.1.2
      - joblib==0.17.0
      - numpy==1.19.4
      - scikit-learn==0.23.2
    secrets:
      USERNAME: my-classification-product-cloud-storage-credentials
      PASSWORD: my-classification-product-cloud-storage-credentials
    cpu_request: 0.25
    memory_request_mb: 100
    service:
      max_startup_time_seconds: 30
      replicas: 2
      port: 5000
      ingress: true
Every stage must have either a batch or service sub-section defined, depending on whether the stage is a batch stage or service stage, respectively. If batch is selected, then the executable Python module will be run as a discrete job (with a start and an end), and will be managed as a Kubernetes job. If service is selected, then the executable script will be run as part of a Kubernetes deployment and will expose a Kubernetes cluster-ip service to enable access over HTTP, within the cluster.
Top-level stage configuration parameters are to be used as follows:
executable_module_path- The path to the executable Python module to run for the stage. Executable means that executing
python model_scoring_app.pyfrom the CLI would cause the module to run. args- An optional list of arguments to pass to the executable Python module (as strings).
requirements- An optional list of Python package dependencies that need to be installed into the Python environment, for the executable module to run successfully. This is same list that you would normally specify in a
requirements.txtfile. cpu_requestandmemory_request_mb- The compute resources to request from the cluster in order to run the stage. For more information on the units used in these parameters refer here.
The secrets sub-section is optional and is covered in more depth below.
Batch Stages
An example batch stage configuration for the prepare_data stage could be as follows,
stages:
  prepare_data:
    ...
    batch:
      max_completion_time_seconds: 30
      retries: 2
Where:
max_completion_time_seconds- Time to wait for the given task to run, before retrying or raising a workflow execution error.
retries- Number of times to retry executing a failed stage, before raising a workflow execution error.
Service Deployment Stages
An example service configuration for the model_scoring_service stage could be as follows,
stages:
  model_scoring_service:
    ...
    service:
      max_startup_time_seconds: 30
      replicas: 2
      port: 5000
      ingress: true
Where:
max_startup_time_seconds- Time to wait for the service to be 'ready' without any errors having occurred. When the service reaches the time limit without raising errors, then it will be marked as 'successful'. If a service deployment stage fails to be successful, then the deployment will be automatically rolled-back to the previous version.
replicas- Number of independent containers running the service started by the stage's executable Python module -
model_scoring_app.py. The service endpoint will automatically route requests to each replica in-turn. port- The port to expose on the container - e.g. Flask-based services usually send and receive HTTP requests on port
5000. ingress- Whether or not to create a route (or path) from the cluster's externally-facing ingress controller, to this service. If set to
True, it will enable external requests to reach the service via the ingress controller (acting as an API gateway), with the following URL, http://YOUR_CLUSTERS_EXTERNAL_IP/NAMESPACE/SERVICE_STAGE_NAME- See Configuring Ingress for more information on exposing services to external HTTP requests.
Injecting Secrets
Credentials will be required whenever you wish to pull data or persist models to cloud storage, access private APIs, etc. We provide a secure mechanism for dynamically injecting credentials as environment variables within the container running a stage.
The first step in this process is to store your project's secret credentials, securely within its namespace - see Managing Credentials and Other Secrets below for instructions on how to achieve this using Bodywork.
The second step is to configure the use of this secret with the secrets sub-section of a stage's configuration, within the bodywork.yaml file. For example,
stages:
  model_scoring_service:
    ...
    secrets:
      USERNAME: my-classification-product-cloud-storage-credentials
      PASSWORD: my-classification-product-cloud-storage-credentials
Will instruct Bodywork to look for values assigned to the keys USERNAME and PASSWORD within the Kubernetes secret named my-classification-product-cloud-storage-credentials. Bodywork will then assign these secrets to environment variables within the container, called USERNAME and PASSWORD, respectively. These can then be accessed from within the stage's executable Python module - for example,
import os


if __name__ == '__main__':
    username = os.environ['USERNAME']
    password = os.environ['PASSWORD']
Configuring Logging
Logging configuration is contained within the logging section of the bodywork.yaml file. From the example above we have,
logging:
  log_level: INFO
Where:
log_level- Must be one of:
DEBUG,INFO,WARNING,ERRORorCRITICAL. This is used to set the types of log message to stream to the workflow-controller's standard output stream (stdout).
Validating the bodywork.yaml Configuration File
The bodywork.yaml file can be checked for errors by issuing the following command from the CLI,
$ bodywork validate --check-files
The optional --check-files flag will check that all executable_module_path paths map to files that exist and can be reached by Bodywork, from the root directory where bodywork.yaml is located (assumed to be current working directory). Validation errors will be reported in the terminal.
Configuring Namespaces
Each Bodywork project should operate within its own namespace in your Kubernetes cluster. To setup a Bodywork compatible namespace, issue the following command from the CLI,
$ bodywork setup-namespace my-classification-product
Which will yield the following output,
creating namespace=my-classification-product
creating service-account=bodywork-workflow-controller in namespace=my-classification-product
creating cluster-role-binding=bodywork-workflow-controller--my-classification-product
creating service-account=bodywork-jobs-and-deployments in namespace=my-classification-product
We can see that in addition to creating the namespace, two service-accounts will also be created. This will grant containers in my-classification-product the appropriate authorisation to run workflows, batch jobs and deployments within the newly created namespace. Additionally, a binding to a cluster-role is also created. This will enable containers in the new namespace to list all available namespaces on the cluster. The cluster-role will be created if it does not yet exist.
Managing Secrets
Credentials will be required whenever you wish to pull data or persist models to cloud storage, or access private APIs from within a stage. We provide a secure mechanism for dynamically injecting secret credentials as environment variables into the container running a stage. Before a stage can be configured to inject a secret into its host container, the secret has to be placed within the Kubernetes namespace that the workflow will be deployed to. This can be achieved from the command line - for example,
$ bodywork secret create \
    --namespace=my-classification-product \
    --name=my-classification-product-cloud-storage-credentials \
    --data USERNAME=bodywork PASSWORD=bodywork123!
Will store USERNAME and PASSWORD within a Kubernetes secret resource called my-classification-product-cloud-storage-credentials in the my-classification-product namespace. To inject USERNAME and PASSWORD as environment variables within a stage, see Injecting Secrets into Stage Containers below.
Working with Private Git Repositories using SSH
When working with remote Git repositories that are private, Bodywork will attempt to access them via SSH. For example, to setup SSH access for use with GitHub, see this article. This process will result in the creation of a private and public key-pair to use for authenticating with your remote Git host. The private key must be stored as a Kubernetes secret in the project's namespace, using the following naming convention for the secret name and secret data key,
$ bodywork secret create \
    --namespace=my-classification-product \
    --name=ssh-git-private-key \
    --data BODYWORK_GIT_SSH_PRIVATE_KEY=paste_your_private_key_here
A convenient way to assign this variable direct from a private key file, e.g. one stored in ~/.shh/id_rsa, is to use BODYWORK_GIT_SSH_PRIVATE_KEY="$(cat ~/.shh/id_rsa)".
When executing a workflow defined in a private Git repository, make sure to use the SSH protocol when specifying the git-repo-url - e.g. use,
git@github.com:my-github-username/my-classification-product.git
As opposed to,
https://github.com/my-github-username/my-classification-product
Accessing the Project's Git Commit Hash for Tagging ML Artefacts
The Git commit hash of your project can be accessed from within any Bodywork container, via the GIT_COMMIT_HASH environment variable. This allows you to tag any artefacts produced by your pipelines, such as datasets and trained models, with the precise version of the pipeline used to create them. For example,
import os

git_hash = os.getenv('GIT_COMMIT_HASH')
model_filename = f'my-classifier--pipeline={git_hash}.pkl'
save_model(model, model_filename)
Testing Workflows Locally
Workflows can be triggered locally from the command line, with the workflow-controller logs streamed to your terminal. In this mode of operation, the workflow-controller is operating on your local machine, but it is still orchestrating containers on Kubernetes remotely. It will still clone your project from the specified branch of the Bodywork project's Git repository, and delete it when finished.
For the example project used throughout this user guide, the CLI command for triggering the workflow locally using the master branch of the remote Git repository, would be as follows,
$ bodywork deployment create \
    --namespace=my-classification-product \
    --name=test-deployment \
    --git-repo-url=https://github.com/my-github-username/my-classification-product \
    --git-repo-branch=master \
    --local-workflow-controller
Testing Service Deployments
A brief summary of all service-related information can be retrieved by issuing,
$ bodywork service display \
    --namespace=my-classification-product
Which will yield output like,
-------------------------------------------------
my-classification-product--model-scoring-service:
-------------------------------------------------
|- GIT_URL               https://github.com/my-github-username/my-classification-product
|- GIT_BRANCH            master
|- REPLICAS_AVAILABLE    1
|- REPLICAS_UNAVAILABLE  0
|- EXPOSED_AS_SERVICE    true
|- CLUSTER_SERVICE_URL   http://my-classification-product--model-scoring-service.my-classification-product.svc.cluster.local
|- CLUSTER_SERVICE_PORT  5000
|- INGRESS_CREATED       true
|- INGRESS_ROUTE         /my-classification-product/my-classification-product--model-scoring-service
Service deployments are accessible via HTTP from within the cluster - they cannot be exposed to the public internet, unless you have installed an ingress controller in your cluster. The simplest way to test a service from your local machine, is by using a local proxy server to enable access to your cluster. This can be achieved by issuing the following command,
$ kubectl proxy
Then in a new shell, you can use the curl tool to test the service. For example, issuing,
$ curl http://localhost:8001/api/v1/namespaces/my-classification-product/services/my-classification-product--model-scoring-service/proxy \
    --request POST \
    --header "Content-Type: application/json" \
    --data '{"x": 5.1, "y": 3.5}'
Should return the payload according to how you've defined your service in the executable Python module - e.g. in the model_scoring_app.py file.
If you have installed an ingress controller in your cluster, and if the the stages.STAGE_NAME.service.ingress configuration parameter has been set to true, then the service can be tested via the public internet using,
$ curl http://YOUR_CLUSTERS_EXTERNAL_IP/my-classification-product/my-classification-product--model-scoring-service/ \
    --request POST \
    --header "Content-Type: application/json" \
    --data '{"x": 5.1, "y": 3.5}'
See here for instruction on how to retrieve YOUR_CLUSTERS_EXTERNAL_IP.
Deleting Service Deployments
Once you have finished testing, you may want to delete any service deployments that have been created. To list all active service deployments within a namespace, issue the command,
$ bodywork service display \
    --namespace=my-classification-project
Then to delete a service deployment use,
$ bodywork service delete
    --namespace=my-classification-project
    --name=my-classification-product--model-scoring-service
Workflow-Controller Logs
All logs should start in the same way,
2020-11-24 20:04:12,648 - INFO - workflow.run_workflow - attempting to run workflow for project=https://github.com/my-github-username/my-classification-product on branch=master in kubernetes namespace=my-classification-product
2020-11-24 20:04:15,579 - INFO - workflow.run_workflow - attempting to execute DAG step=['prepare-data']
2020-11-24 20:04:15,580 - INFO - workflow.run_workflow - creating job=my-classification-product--prepare-data in namespace=my-classification-product
...
After a stage completes, you will notice that the logs from within the container are streamed into the workflow-controller logs. For example,
----------------------------------------------------------------------------------------------------
---- pod logs for my-classification-product--prepare-data
----------------------------------------------------------------------------------------------------
2020-11-24 20:04:18,917 - INFO - stage.run_stage - attempting to run stage=prepare-data from master branch of repo at https://github.com/my-github-username/my-classification-product
...
The aim of this log structure is to provide a useful way of debugging workflows out-of-the-box, without forcing you to integrate a complete logging solution. This is not a replacement for a complete logging solution - e.g. one based on Elasticsearch. It is intended as a temporary solution to get your ML projects operational, as quickly as possible.
Deploying Workflows
Workflows can be executed remotely using,
$ bodywork deployment create \
    --namespace=my-classification-product \
    --name=initial-deployment \
    --git-repo-url=https://github.com/my-github-username/my-classification-product \
    --git-repo-branch=master \
    --retries=2
You can check on the status of the deployment using,
$ bodywork deployment display \
    --namespace=my-classification-product
Which will yield output like,
JOB_NAME              START_TIME                    COMPLETION_TIME               ACTIVE      SUCCEEDED       FAILED
initial-deployment    2020-12-11 20:21:04+00:00     2020-12-11 20:23:12+00:00     0           1               0
And retrieve the logs using,
$ bodywork deployment logs \
    --namespace=my-classification-product \
    --name=initial-deployment
Which will stream logs directly to your terminal. This output stream could also be redirected to a local file by using a shell redirection command such as,
$ bodywork deployment logs ... > log.txt
To overwrite the existing contents of log.txt, or,
$ bodywork deployment logs ... >> log.txt
To append to the existing contents of log.txt.
After your deployment has completed, you can clean-up the job used to run the remote workflow-controller using,
$ bodywork deployment delete_job \
    --namespace=my-classification-product \
    --name=initial-deployment
As not all clusters are configured to clean-up these jobs up automatically, so the cluster resources allocated to them will need to be freed-up manually.
Scheduling Workflows
If your workflows are executing successfully, then you can schedule the workflow-controller to operate remotely on the cluster as a Kubernetes cronjob. For example, issuing the following command from the CLI,
$ bodywork cronjob create \
    --namespace=my-classification-product \
    --name=my-classification-product \
    --schedule="0,15,30,45 * * * *" \
    --git-repo-url=https://github.com/my-github-username/my-classification-product \
    --git-repo-branch=master \
    --retries=2
Would schedule our example project to run every 15 minutes. The cronjob's execution history can be retrieved from the cluster using,
$ bodywork cronjob history \
    --namespace=my-classification-product \
    --name=my-classification-product
Which will yield output along the lines of,
JOB_NAME                                START_TIME                    COMPLETION_TIME               ACTIVE      SUCCEEDED       FAILED
my-classification-product-1605214260    2020-11-12 20:51:04+00:00     2020-11-12 20:52:34+00:00     0           1               0
Accessing Historic Logs
The logs for each job executed by the cronjob are contained within the remote workflow-controller. The logs for a single workflow execution attempt can be retrieved by issuing the bodywork cronjob logs command on the CLI - for example,
$ bodywork cronjob logs \
    --namespace=my-classification-product-1605214260 \
    --name=my-classification-product-1605214260
Would stream logs directly to your terminal, from the workflow execution attempt labelled my-classification-product-1605214260, in precisely the same way as was described for the bodywork deployment logs command described above.
Bodywork Analytics
We collect basic usage statistics to help us understand adoption of Bodywork as a deployment tool. Every time you run a workflow, Bodywork will ping a remote server to increment a counter (nothing more). We do not store any data about you or your workflows (not even your IP address). You can see the code for this here. If you wish to disable this, then set project.usage_stats: false in your bodywork.yaml file.