Deploying a Batch Job
This tutorial refers to files within a Bodywork template project hosted on GitHub - check it out here. If you want to execute the examples, you will need to have setup access to a Kubernetes cluster and installed bodywork on your local machine.
We strongly recommend that you find five minutes to read about the key concepts that Bodywork is built upon, before beginning to work-through the examples below.
Working with private repositories
If you've cloned the example project into a private repository and intend to use it for this tutorial, then you will need to follow the necessary configuration steps detailed here.
What am I going to Learn?
- How to take a Python module defining a ML task (or job) and deploy it to Kubernetes.
- How to test the deployment.
- How to run the job on a schedule, without the manual intervention of an ML engineer.
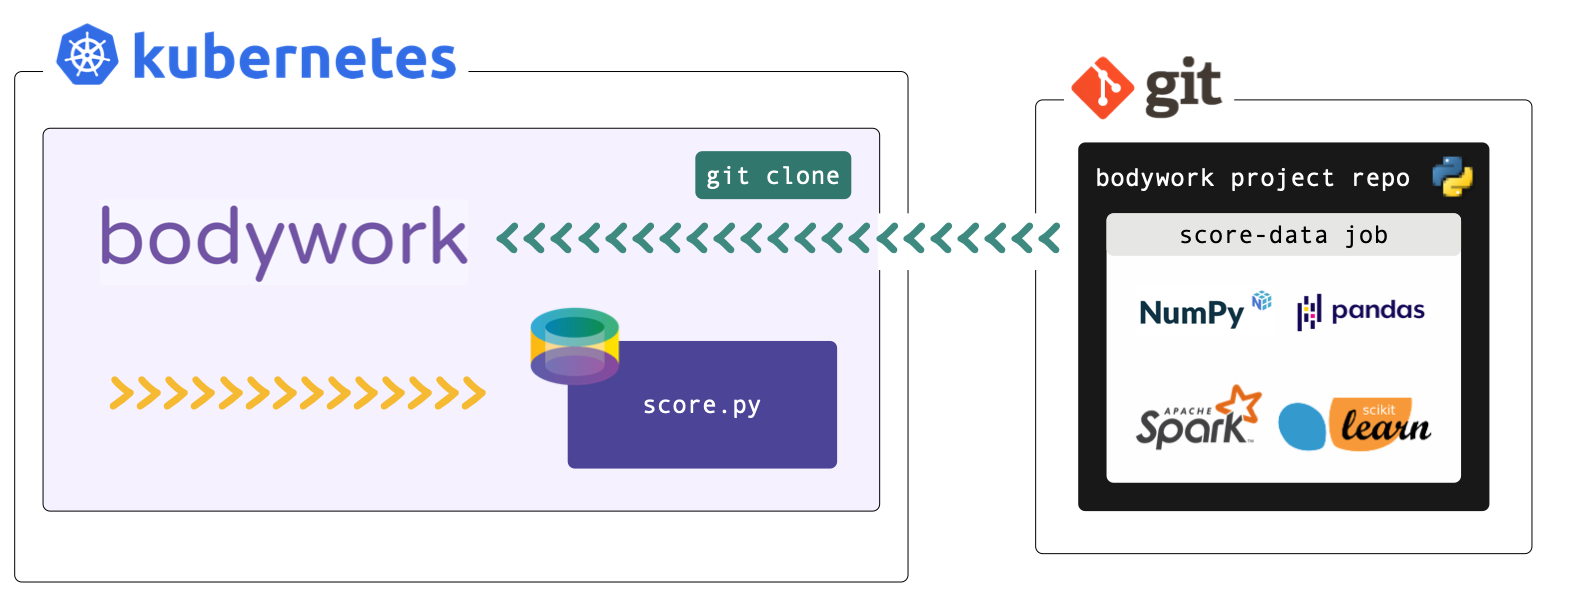
Scoring a Dataset with a Model
The example task that we want to deploy as a batch job, is to load a pre-trained model and use it to score a dataset. The latest dataset will be downloaded from cloud storage (AWS S3) and the pre-trained model will be bundled with the executable Python module defining the job - this is for convenience (not as a best practice).
The project for this single-stage workflow is packaged as a GitHub repository and is structured as follows,
root/
 |-- score_data/
     |-- score.py
     |-- classification_model.joblib
 |-- bodywork.yaml
Configuring the Job
All of the configuration for this deployment is held within the bodywork.yaml file, whose contents are reproduced below.
version: "1.0"
project:
  name: bodywork-batch-job-project
  docker_image: bodyworkml/bodywork-core:latest
  DAG: score_data
stages:
  score_data:
    executable_module_path: score_data/score.py
    requirements:
      - boto3==1.16.15
      - joblib==0.17.0
      - pandas==1.1.4
      - scikit-learn==0.23.2
    cpu_request: 0.5
    memory_request_mb: 100
    batch:
      max_completion_time_seconds: 30
      retries: 2
logging:
  log_level: INFO
The stages.score_data.executable_module_path parameter points to the executable Python module - score.py - that defines what will happen when the score_data (batch) stage is executed, within a pre-built Bodywork container. This module contains the code required to:
- download the new dataset from cloud storage (AWS S3);
- load the pre-trained model
classification_model.joblib; - score the dataset; and,
- save the results back to cloud storage (AWS S3).
It can be summarised as,
from urllib.request import urlopen

# other imports
# ...

DATA_URL = ('http://bodywork-batch-job-project.s3.eu-west-2.amazonaws.com'
            '/data/iris_classification_data.csv')

# other constants
# ...


def main() -> None:
    """Main script to be executed."""
    data = download_dataset(DATA_URL)
    model = load(TRAINED_MODEL_FILENAME)
    scored_data = score_data(data, model)
    upload_results(scored_data)


# other functions definitions used in main()
# ...


if __name__ == '__main__':
    main()
We recommend that you spend five minutes familiarising yourself with the full contents of score.py. When Bodywork runs the stage, it will do so in the same way as if you were to run,
$ python score.py
And so everything defined in main() will be executed.
The stages.score_data.requirements parameter in the bodywork.yaml file lists the 3rd party Python packages that will be Pip-installed on the pre-built Bodywork container, as required to run the score.py module. In this example we have,
boto3==1.16.15
joblib==0.17.0
pandas==1.1.4
scikit-learn==0.23.2
boto3- for interacting with AWS;joblib- for persisting models;pandas- for manipulating the raw data; and,scikit-learn- for training the model.
Finally, the remaining parameters in stages.score_data section of the bodywork.yaml file allow us to configure the remaining key parameters for the stage,
stages:
  score_data:
    executable_module_path: score_data/score.py
    requirements:
      - boto3==1.16.15
      - joblib==0.17.0
      - pandas==1.1.4
      - scikit-learn==0.23.2
    cpu_request: 0.5
    memory_request_mb: 100
    batch:
      max_completion_time_seconds: 30
      retries: 2
From which it is clear to see that we have specified that this stage is a batch stage (as opposed to a service stage), together with an estimate of the CPU and memory resources to request from the Kubernetes cluster, how long to wait and how many times to retry, etc.
Configuring the Workflow
The project section of the bodywork.yaml file contains the configuration for the whole workflow, which in this case consists of a single stage as defined in the stages.scoring_service section of bodywork.yaml.
project:
  name: bodywork-batch-job-project
  docker_image: bodyworkml/bodywork-core:latest
  DAG: score_data
The most important element is the specification of the workflow DAG, which in this instance is simple and will instruct the Bodywork workflow-controller to run the score_data stage.
Testing the Workflow
Firstly, make sure that the bodywork package has been Pip-installed into a local Python environment that is active. Then, make sure that there is a namespace setup for use by Bodywork projects - e.g. bodywork-batch-jobs - by running the following at the command line,
$ bodywork setup-namespace bodywork-batch-jobs
Which should result in the following output,
creating namespace=bodywork-batch-job
creating service-account=bodywork-workflow-controller in namespace=bodywork-batch-jobs
creating cluster-role-binding=bodywork-workflow-controller--bodywork-batch-jobs
creating service-account=bodywork-jobs-and-deployments in namespace=bodywork-batch-jobs
Then, the workflow can be tested by running the workflow-controller locally (to orchestrate remote containers on k8s), using,
$ bodywork deployment create \
    --namespace=bodywork-batch-jobs \
    --name=test-deployment \
    --git-repo-url=https://github.com/bodywork-ml/bodywork-batch-job-project \
    --git-repo-branch=master \
    --local-workflow-controller
Which will run the workflow defined in the master branch of the project's remote Git repository, all within the bodywork-batch-jobs namespace. The logs from the workflow-controller and from the container running the stage, will be streamed to the command-line to inform you on the precise state of the workflow, but you can also keep track of the current state of all Kubernetes resources created by the workflow-controller in the bodywork-batch-jobs namespace, by using the Kubectl CLI tool - e.g.,
$ kubectl -n bodywork-batch-jobs get all
Scheduling the Workflow
If you're happy with the test results, you can schedule the workflow-controller to operate remotely on the cluster, on a pre-defined schedule. For example, to setup the the workflow to run every hour, use the following command,
$ bodywork cronjob create \
    --namespace=bodywork-batch-jobs \
    --name=score-data \
    --schedule="0 * * * *" \
    --git-repo-url=https://github.com/bodywork-ml/bodywork-batch-job-project \
    --git-repo-branch=master \
    --retries=2
Each scheduled workflow will attempt to re-run the batch-job, as defined by the state of this repository's master branch at the time of execution.
To get the execution history for all score-data jobs use,
$ bodywork cronjob history \
    --namespace=bodywork-batch-jobs \
    --name=score-data
Which should return output along the lines of,
JOB_NAME                                START_TIME                    COMPLETION_TIME               ACTIVE      SUCCEEDED       FAILED
score-data-1605214260                   2020-11-12 20:51:04+00:00     2020-11-12 20:52:34+00:00     0           1               0
Then to stream the logs from any given cronjob run (e.g. to debug and/or monitor for errors), use,
$ bodywork cronjob logs \
    --namespace=bodywork-batch-jobs \
    --name=score-data-1605214260
Cleaning Up
To clean-up the deployment in its entirety, delete the namespace using kubectl - e.g. by running,
$ kubectl delete ns bodywork-batch-jobs